In this step of the tutorial you learn how to use keyboard keys to scroll in those application components which support scrolling. You also set the application focus to work with the pointer input.
Set keyboard keys to scroll the list box in the Car application screen
In this section you set focus to the Car Grid List Box node to allow the user to scroll the list items in the Car application screen.
When a Grid List Box node has focus use:
The ↑ (Up Arrow) and ↓ (Down Arrow) keyboard keys to scroll the list items in a vertical list box
The → (Right Arrow) and ← (Left Arrow) keyboard keys to scroll the list items in a horizontal list box
The Home keyboard key selects the first list item
The End keyboard key selects the last list item
The Page Up and Page Down keyboard keys go to the beginning and end of the visible area of a list box
To set keyboard keys to scroll the list box in the Car application screen:
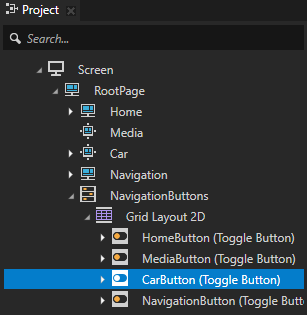
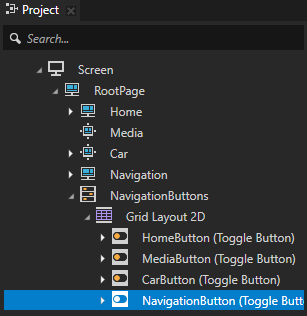
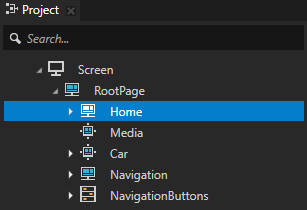
In the Project > RootPage > NavigationButtons > Grid Layout 2D select the CarButton node and in the Properties set the Up Navigation Node property to #Car Grid List Box. You move focus from the CarButton node to the Car Grid List Box node when the user presses the ↑ (Up Arrow) key on the keyboard.
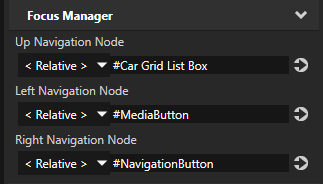
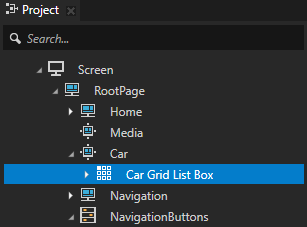
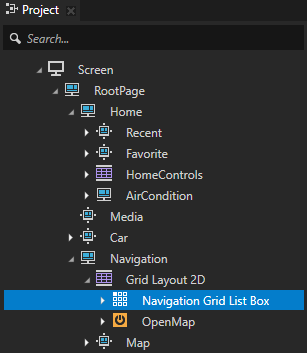
In the Project > RootPage > Car select the Car Grid List Box node and in the Properties add and set:
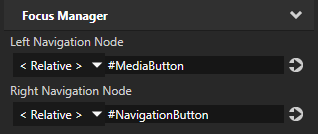
Left Navigation Node property to #MediaButton. You set focus from the Car Grid List Box node to the MediaButton node when the user presses the ← (Left Arrow) key on the keyboard.
Right Navigation Node property to #NavigationButton. You set focus from the Car Grid List Box node to the NavigationButton node when the user presses the → (Right Arrow) key on the keyboard.
In the Preview when you use the → (Right Arrow) key to navigate to the Page node Car, use:
The ↑ (Up Arrow) and ↓ (Down Arrow) keys scroll the selection of list items.
The Home and Page Up keys select the first list item.
The End and Page Down keys select the last list item.
Set keyboard keys to scroll the list box in the Navigation application screen
In this section you set focus to the Navigation Grid List Box node to allow the user to scroll the list items in the Navigation application screen.
To set keyboard keys to scroll the list on the Navigation application screen:
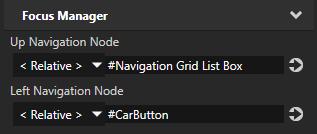
In the Project > RootPage > NavigationButtons > Grid Layout 2D select the NavigationButton node, in the Properties add the Up Navigation Node property, and set it to #Navigation Grid List Box. You set focus from the NavigationButton node to the Navigation Grid List Box node when the user presses the ↑ (Up Arrow) key on the keyboard.
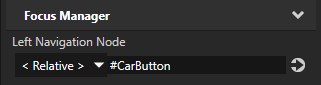
In the Project > RootPage > Navigation > Grid Layout 2D select the Navigation Grid List Box node and in the Properties add and set the Left Navigation Node property to #CarButton. You set focus from the Navigation Grid List Box node to the CarButton node when the user presses the ← (Left Arrow) key on the keyboard.
In the Preview when you use the → (Right Arrow) key to navigate to the Page node Navigation, use:
The ↑ (Up Arrow) and ↓ (Down Arrow) keys scroll the selection of list items.
The Home and Page Up keys select the first list item.
The End and Page Down keys select the last list item.
Set a key to open the Map application screen
In this section you set focus to the button which opens the Map application screen so that you can open the Map application screen.
To set a key to open the Map application screen:
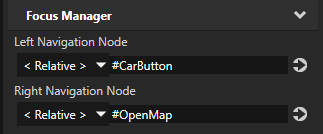
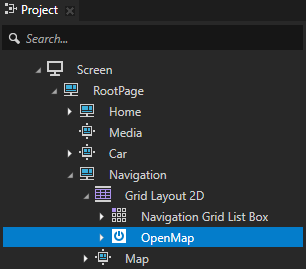
In the Project > RootPage > Navigation > Grid Layout 2D select the Navigation Grid List Box node and in the Properties add and set the Right Navigation Node property to #OpenMap. You set focus from the Navigation Grid List Box node to the OpenMap button when the user presses the → (Right Arrow) key on the keyboard.
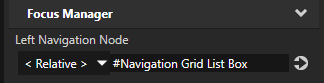
In the Project > RootPage > Navigation > Grid Layout 2D select the OpenMap node and in the Properties add and set the Left Navigation Node property to #Navigation Grid List Box.
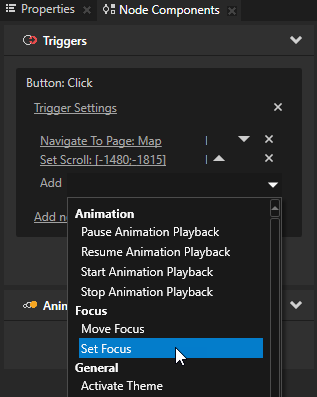
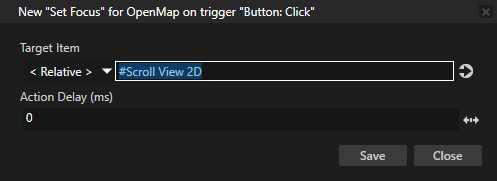
In the Project > RootPage > Navigation > Grid Layout 2D select the OpenMap node, in the Node Components add to the Button: Click trigger a Set Focus action, and set the Target Item to #Scroll View 2D. You set focus to the Scroll View node which scrolls the map on the Map application screen when the user presses the OpenMap button to open that application screen.
When you set focus to the button which you use to open the Map application screen, press the Enter key on the keyboard to click that button.
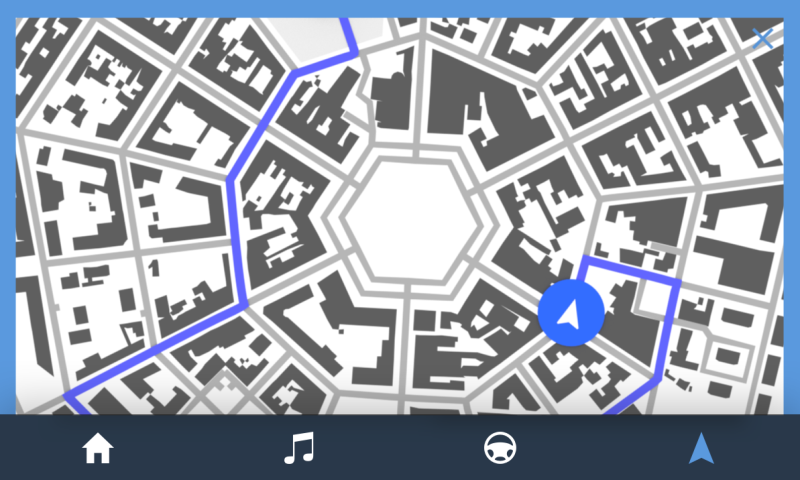
When you navigate to the Map application screen, you can use the arrow keys on the keyboard to scroll the map.
Set a key to close the Map application screen
In this section you add the functionality to close the Map window when the user presses the E key on the keyboard.
To set a key to close the Map application screen:
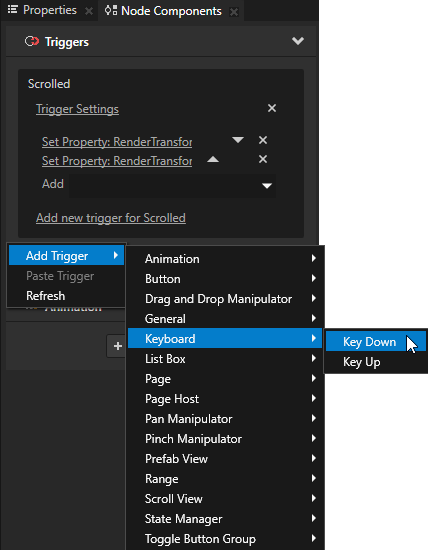
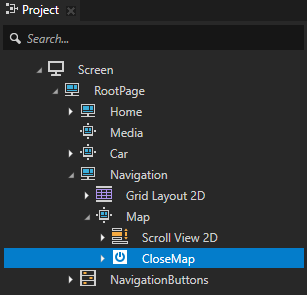
In the Project > RootPage > Navigation > Map select the Scroll View 2D node and in the Node Components add a Key Down trigger.
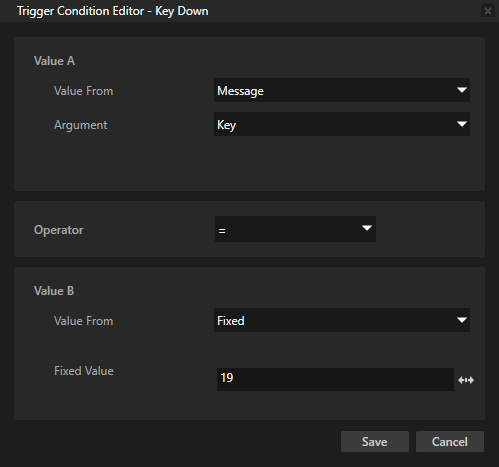
In the Trigger Settings for the trigger you created in the previous step click Add condition and in the Trigger Condition Editor set:
Value A
Value From to Message
Argument to Key
Operator to =
Value B
Value From to Fixed
Fixed Value to 19
In the Trigger Condition Editor and the Trigger Settings Editor windows click Save You set the application to close the Map application screen when the user presses the E key.
Add to the Key Down trigger the actions you need to close the Map application screen:
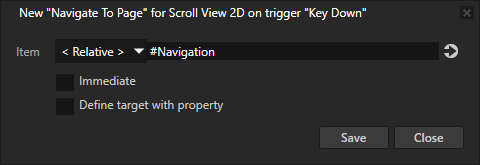
A Navigate to Page action and set the Item to #Navigation. You set the application to navigate to the Navigation page.
A Set Focus action and set the Target Item to #Navigation Grid List Box. You use this action to set focus to the Navigation Grid List Box when the user closes the Map application screen.
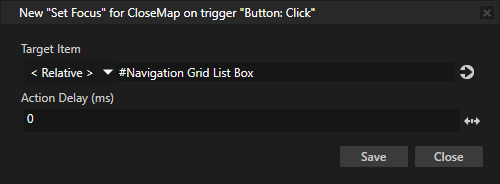
In the Project > RootPage > Navigation > Map select the CloseMap node, in the Node Components add to the Button: Click trigger a Set Focus action, and set the Target Item to #Navigation Grid List Box. When the user uses the pointer to click the CloseMap button which closes the Map application screen, the application sets the focus back to the Navigation Grid List Box node.
In the Preview use the E key to close the Map application screen.
Finalize the keyboard navigation
In this section you finalize the keyboard navigation to make sure that the key input works together with pointer input. Because you set focus based on which keyboard key the user presses, using the pointer does not set the focus in the correct place. If you use the keyboard to navigate to a Page node and set focus to a button on that Page, and then use the pointer to close that Page, the focus remains on that button.
To finalize the keyboard navigation:
In the Project > RootPage select the Home node, in the Node Components add the Page Activated trigger, add to that trigger a Set Focus action, and set the Target Item to #HomeButton.
Repeat the previous step for other Page nodes in the application but in the Set Focus action set the Target Item to:
#MediaButton for the Media node
#Car Grid List Box for the Car node
#Navigation Grid List Box for the Navigation node
#DriverButton for the Driver node
#PassengerButton for the Passenger node
In the Preview you can now use both the keyboard keys you have defined in this tutorial and your pointer to navigate the application.
Use these keyboard keys to navigate the application:
→ (Right Arrow) and ← (Left Arrow) keys to navigate between the application screens.
In the Home screen use:
→ (Right Arrow) and ← (Left Arrow) keys to navigate between the Recent and Favorite screens.
↑ (Up Arrow) key to:
Set focus to the button which navigates to the AirCondition screen.
If the button has focus, navigate to the Recent or Favorite screen based on which of those screens is active.
↓ (Down Arrow) key to:
Set focus to the button which navigates to the AirCondition screen.
If the button has focus, set focus to the Screen node to use the navigation bar.
Enter key to navigate to the AirCondition screen when the button has focus.
In the AirCondition screen use:
→ (Right Arrow) and ← (Left Arrow) keys to:
Navigate between the Driver and Passenger screens.
Set slider values.
↑ (Up Arrow) key to set focus to the slider.
↓ (Down Arrow) key to set focus to the Driver or Passenger screen.
E key to close the AirCondition screen.
In the Car screen use:
↑ (Up Arrow) and ↓ (Down Arrow) keys to scroll the list box items.
In the Navigation screen use:
↑ (Up Arrow) and ↓ (Down Arrow) keys to scroll the list box items.
Enter key to navigate to the Map screen.
In the Map screen use:
→ (Right Arrow), ← (Left Arrow), ↑ (Up Arrow), and ↓ (Down Arrow) keys to scroll the map.
In this tutorial you learned how to add keyboard input to an application using the Kanzi focus manager and JavaScript scripts. Now you can learn more about how to: